Mostrando entradas con la etiqueta marcapáginas. Mostrar todas las entradas

miércoles, 20 de abril de 2011

Marcapáginas Cactus (Cactus Bookmark)...

Hola por aquí!
Hi for here!
Cómo le platiqué aquí las cactáceas y suculentas me gustan mucho y por eso va este sencillísimo marcapáginas...
How he talked here cactus and succulents I like very much, and therefore is this simple bookmark ...
Instrucciones:
 Instructions:
 1.-Para la maceta: Tejer una hilera de cadenas y de regreso tejer puntos altos hasta terminar, en la siguiente vuelta hacer disminuciones en los extremos y los demás serán puntos altos, tejer  3 vueltas más sin disminuír y terminar con puntos bajos, rematar el hilo...
1.-For the pot: Knit one row of chains and weave back double crochet stitches to finish, in the next round to  make decreases in the ends and the other will be double crochet, knit 3 laps unabated and for the end knit one round to single crochet, finish off the thread ...
2.-Para los cactus: Hacer una hilera de cadenas y tejer de ida y vuelta en puntos bajos, para redondear la punta hacer un par de aumentos en los puntos de los extremos, cambié de color para hacer un segundo cactus más chico...
2.-For the cactus: Make a row of chains and weave back and forth at single crochet, to round the tip to make a couple of increases in the end, I changed the color to make a second smallest cactus .. .
3.-Finalmente tejí unos picots en las puntas para las flores, bordé pequeñas cruces para simular espinas y decoré un poquito la maceta...
3.-Finally wove a picots at the tips for flowers, I embroidered little crossings to simulate small spines and decorated the pot a little ...

Para aplanar el tejido humedecí un poco y pasé la plancha tibia un par de veces, el hilo es algodón mercerizado Omega #6 y usé gancho de metal # 6...
To flatten the tissue slightly moistened and spent the warm iron a few times, I use mercerized cotton yarn "Omega" # 6 and used metal hook # 6 (1.75mm) ...

Sean muy felices y Au revoir!...
Be very happy and see you!...

jueves, 3 de marzo de 2011

Periquito de Marzo (March Parakeet)...

Hola!
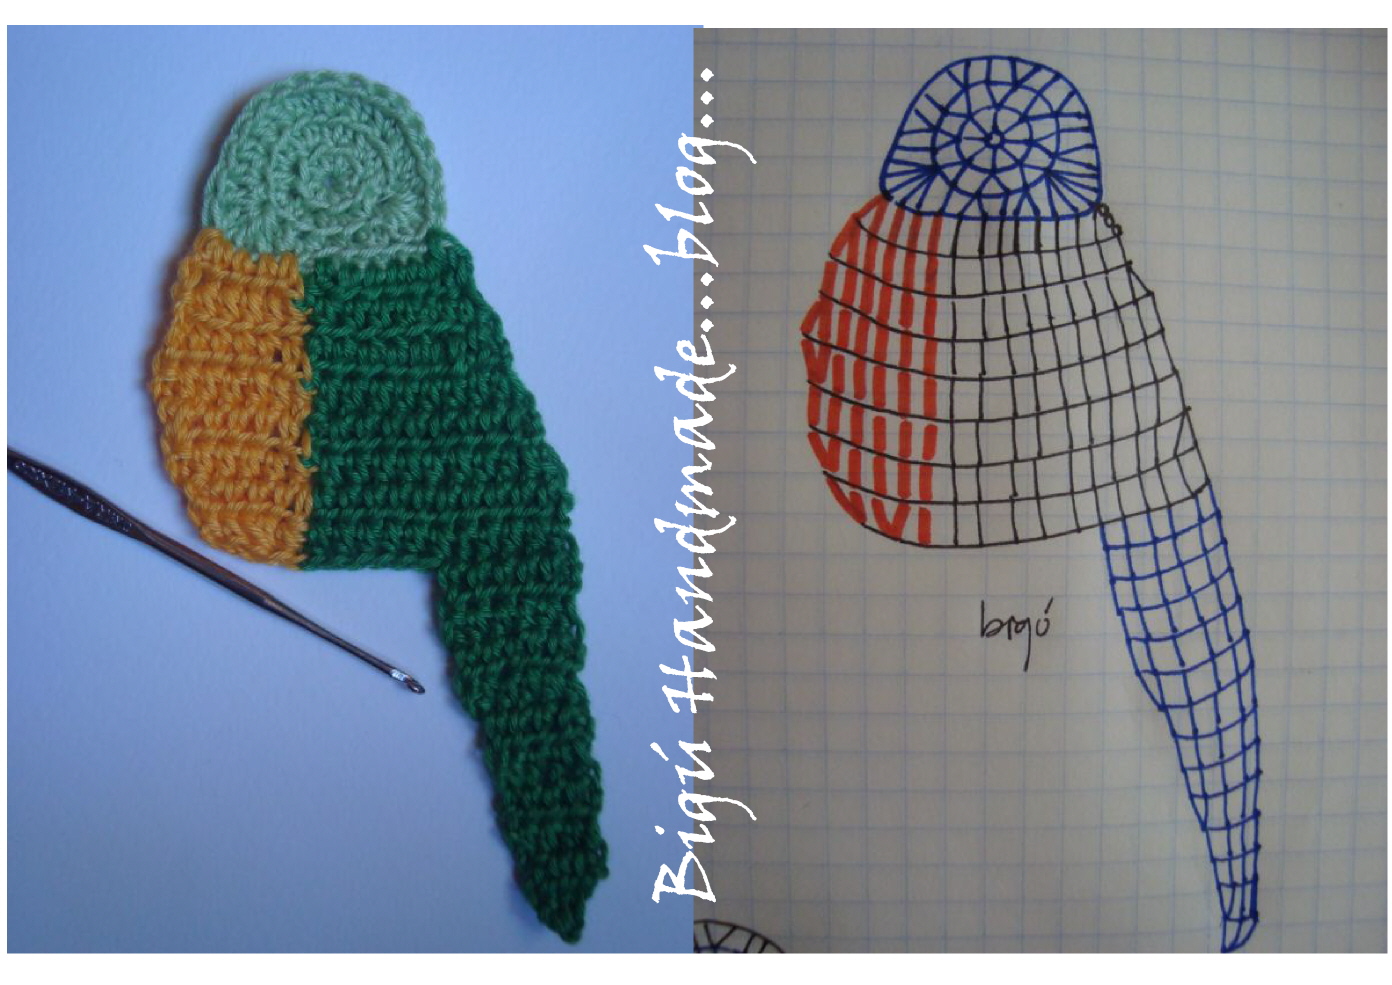
Ya les conté la historia relacionada con éste marcapáginas con forma de periquito, ahora les cuento cómo hacerlo...
Usé hilaza mercerizada Omega del no.6 y gancho de acero del no. 4, estambre acrílico de tres hebras para borday y coser.
Hi!
I told you the story about this bookmark shaped like parakeet, now how do I tell ...

I use mercerized cotton Omega no. 6 and steel hook no. 4 ( 1.75-2.00 mm), acrilic yarn for embroidery and sew...
Instrucciones:
Instructions:
La cabeza:
vuelta 1: Iniciar con anillo deslizable y tejer 8 medios puntos (enanos o media vareta).
vuelta 2: Tejer todos aumentos, total 16 puntos.
vuelta 3: Tejer 5 medios puntos (m.p.) en el punto de inicio de la vuelta, tejer ( 1 aumento-1 m.p) 5 veces, tejer 5 m.p. en el mismo punto y (1 m.p-1 aum) 2 veces, rematar el hilo.
The head:
row 1: Started with magic adjustable loop and knit 8 half double crochet stitches (hdc).
row 2: Weave all increases, for a total of 16 stitches.
row 3: Work 5 hc together in the starting point, weave ( 1 increase- 1 hdc) for 5 times, work 5 hc together in the same point and (1 hdc-1 increase) 2 times, finish off the thread.
El cuerpo:
Seguir la distribución según el grafico, los puntos están descritos en el orden de ida y vuelta:
vuelta 1: ( 1 aumento-8 m.p. verdes)( 3 m.p. amarillos- 1 aumento).
vuelta 2: ( 1 aum.- 4 m.p. amarillos)( 9 m.p. verdes).
vuelta 3: ( 1 aum.- 9 m.p. verdes)( 6 puntos amarillos).
vuelta 4:  (1 aum.- 5 m.p. amarillos)( 10 m.p. verdes).
vuelta 5: ( 10 m.p. verdes)( 5 m.p. amarillos- 1 disminución).
vuelta 6: ( 6 m.p. amarillos)( 10 m.p. verdes)
vuelta 7: ( 1 dism.- 9 m.p. verdes)( 4 m.p. amarillos- 1 disminución).
vuelta 8: ( 2 dism.- 1 m.p. amarillo)( 9 m.p. amarillos)
para la cola trabajar en color verde y seguir las disminuciones del gráfico.
Body:
Following the distribution according to the graph, the points are described in the order of outward and return:
row 1: ( 1 increased - 8 hdc green)( 3 hdc yellow-1 increase).
row 2: ( 1 inc - 4 hdc yellow)( 9 hc green).
row 3: 1 inc - 9 hdc green )( 6 hdc yellow).
row 4: ( 1 inc .- 5 hdc yellow)( 10 hdc green).
row 5: ( 10 hdc green)( 5 hdc yellow-1 decrease).
row 6: ( 6 hdc yellow)( 10 hdc green)
row 7: ( 1 dec - 9 hdc green)( 4 hdc yellow-1 decrease).
row 8: ( 2 dec - 1 hdc yellow)( 9 hdc yellow).
For the tail, work in green and follow the graph decreases.
El ala:
vuelta 1: Iniciar con un aro deslizable y tejer 10 medios puntos.
vuelta 2: Tejer todos aumentos (20 m.p.)
vuelta 3: Subir con 3 cadenas y tejer en verde oscuro ( 1 aum- 1 m.p.) 5 veces, cambiar a verde claro (1 m.p- 1 aum), ahora tejer ( 1 aum. en punto alto- 1 punto alto), 1 punto alto y 2 puntos altos sobre la cadena de inicio (ver gráfico).
Tejer 4 vueltas más en amarillo con las disminuciones según indica el gráfico, rematar el hilo...
Wing:
row 1: Start with a slip ring and work 10 hc stitches.
row 2: Knit all increases (20 hdc.)
row 3: Top with 3 chains and weave in dark green (1 inc-1 hdc) 5 times, changing to light green (1 hdc-1 inc), now weave (1 inc. in double crochet-1 dc), 1 dc and 2 dc on the start line of chains (see graph).
Knit 4 more rounds to declines in yellow as shown in the chart, round off the thread ...
 
El pico son 4 medios puntos tejidos en abanico, rematamos y empezamos a tejer toda la orilla con punto deslizado por el derecho del marcapáginas, bordamos el ojo o lo hacemos con fieltro y fijamos el ala con una puntada invisible...
The peak is 4 half double crochet tissue fan, finished and started to weave all the slip stitch edge to the right of the bookmark, eye embroider or do it with felt and set the wing with an invisible stitch ...
Y listo!
Ya podemos disfrutar de nuestra lectura y una linda compañía...
Espero les guste mucho, sean muy felices y hasta la próxima...!
And ready!
We can enjoy our reading and a nice company ...
I hope you liked it a lot, are very happy and until the next ...!

domingo, 31 de octubre de 2010

Kokeshi marcapáginas ( Bookmark Kokeshi)...

Hola !
Hi!
Siguiendo con mi temática marcapaginesca les presento las instrucciones de estos marcapáginas en forma de kokeshi...
Continuing with my theme "marcapaginesca", I present this bookmarks instructions in the form of kokeshi... 
Utilicé algodón en hilaza mercerizada para tejer, gancho de acero no. 6 y diferentes hilos acrílicos para bordar...
Mercerized cotton yarn used for weaving, steel hook # 6 and different acrylic yarns for embroidery...

Instrucciones:
Instructions:

1.-Iniciar con aro deslizable para ajustar al centro y que se note lo menos posible, sobre él 12 puntos altos (todos los utilizados serán de 1 vuelta en el gancho pero con 2 lazadas para salir, excepto cuando se mencione lo contrario).
En la segunda vuelta tejer 1 aumento por cada punto (total 24 puntos altos)...
Star with sliding ring to adjust the center and be noticed as little as possible about it 12 double crochet stitches -dc- (all used will be 1 round on the hook but with 2 loops to go, except where otherwise stated).
In the second round work 1 increase (total 24 dc stitches)...
2.-Cambio de color para el pelo, tejer todos aumentos con puntos altos y dejar 8 puntos libres...
Changing hair color, knit all increases (in double crochet stitch) with high points and leave 8 free points...
3.-Nos regresamos con punto deslizado al medio de la cabeza y empezamos a tejer un medio círculo de 10 puntos altos (3 lazadas de salida) para formar el molote de la peluca, terminar y rematar...
We slipped back to about the middle of the head and began to weave a half circle of 10 dc stitch (3 loops out) to form bun (molote) the wig, complete and finish...
4.-Cambio de color para el kimono, dejamos un punto de la cabeza libre a cada extremo y tejemos en puntos altos, 1 aumento, 4 p.a., 1 aumento...
Color change to the kimono, a point we head open at each end and knit at double crochet stitch, 1 increase, 4 dc, 1 increase...
5.-Tejer en puntos altos las siguientes 2 vueltas, con los aumentos que indica el gráfico orientativo...
Work in the following double crochet stitches  2 laps, with the increases indicating graphic guidance...
6.-Deslizar el hilo hasta el 3er. punto y seguir con puntos altos para empezar a tejer la parte baja del cuerpo (v. gráfico)...
Slide the thread to the 3rd. stitch and continue with double crochet to begin weaving the lower body (see chart)...
Gráfico orientativo...
(Graphic)
7.-Ahora bordamos el fleco de la cara en hilo acrílico color negro para integrar todo el pelo...
Now embroider the fringe of acrylic yarn face black to integrate all of hair...
8.-Bordamos la carita y decoramos el peinado...
We embroider the face and decorate her hair...
9.-Delineamos las mangas y bordamos la faja del kimono...
We outline the sleeves and embroidered kimono belt...
10.-Humedecemos y pasamos la plancha tibia por atrás, tejemos los flecos de abajo y si queremos podemos decorar la vestimenta con diferentes bordados...
Moisten and spent the warm iron from the back, knit fringe below and if we can decorate with different embroidered dress...
Y taraaaaán!, nuestros bonitos marcapáginas ya están listos!!!, qué les pareció?...
And taraaaaán!, our beautiful bookmarks are ready!!!, what they thought?...
Espero que se diviertan haciéndolos y nos compartan sus resultados...
Sean muy felices y au revoir...!
I hope you have fun making them and we share their results...
Are very happy and Au revoir...!
 

sábado, 16 de octubre de 2010

Marcapáginas Matrioska (Matrioska Bookmark)...

Hola por aquí!
Hi here!
Ahora con éste bonito marcapáginas en forma de Matrioska, espero les guste y se animen a hacer algunos...
Now with this beautiful bookmark as Matrioska, hope you like and encourage them to make some...
Para la función de marcapáginas (que debe ser lo más delgado posible), usé hilaza mercerizada para tejer Omega #6, en diversos colores y gancho de acero #6, además de estambre acrílico de 3 hebras para bordar...
For the function of bookmarks (which should be as thin as possible), I used to weave yarn mercerized Omega # 6 in different colors and steel hook # 6, plus acrylic yarn for embroidery...

Aquí van las instrucciones:
Here are the instructions:
Para el rostro:
1.-Aro deslizable o anillo mágico, subimos con dos cadenas y sobre él 9 puntos altos de 2 vueltas (p.a.2v.), para un total de 10 puntos, (aclaro que es una vuelta de hilo sobre el gancho, ensartamos y al sacar las lazadas o bucles sacamos el gancho 2 veces en lugar de tres que es lo normal en un punto alto o vareta, ok?).
La siguiente vuelta son todos aumentos en (p.a.2v.)  y rematar hilo...
Face:1.-ring slider or magic adjustable loop, and came up with two chains and about 9 double crochet stitches (dc), for a total 10 stitches.(clarified that it is a thread around the hook, strung together and make the loops we get the hook 2 times ).
The next round is all increases in dc (for a total 20 stitches) and finish...

Pañoleta:
2.-Cambiar de color y tejer en punto enano (una vuelta al sacar el gancho) un aumento en cada punto hasta terminar...
Scarf (stole):
2.-Change in color, work (1 half double crochet stitch-1 increase) at every stitch until the end ...
3.-Donde terminamos subir con 3 cadenas.
3.-Where we end up with 3 chains.
4.-De ahora en adelante tejemos en (p.a.2v.): 3 puntos, 1 aumento, 4 puntos, 1 aum. y 4 puntos, terminamos y cambiamos de color...
4.-From now on we weave in double crochet: 3 dc, 1 increase (inc), 4 dc, 1 increase and 4 dc, finish and change of color...
Para el cuerpo:
5.-Subimos con 3 cadenas, 5 p.a., 1 aum., 4p.a., 1 aum., 5 p.a.
6.-Subimos con 3 cadenas, 1 aum., 14 puntos a., 1 aum y cerramos la vuelta con 1 p.alto.
siguiente vuelta:subimos con 3 cadenas, 1 aum., 4 p.a., 1 aum., 6 p.a., 1 aum., 4 p.a, 1 aum. y cerramos con 1 punto alto.
siguiente vuelta: tejer el mismo número de puntos...
For the body:
5.-We went with 3 chains, 5 dc, 1 inc., 4 dc., 1 inc., 5 dc.
6.-We went with 3 chains, 1 inc., 14 dc, 1 inc and close the round with 1 dc.
Next round: go up with 3 chains, 1 inc., 4 dc, 1 inc., 6 dc, 1 inc., 4 dc, 1 inc. and close to 1 dc.
Next round: knit the same number of points ...
7.- Empiezan las disminuciones, son 4 vueltas que se tejen igual, ésto es: iniciamos con una disminución, tejemos el mismo número de puntos de la vuelta anterior y cerramos con una disminución. (el tipo de disminución que yo usé no es como la delos amigurumis, sino que me brinqué un punto -ver gráfico-).
7.-Declines start, are 4 turns that weave the same, that is: began to decrease, knit the same number of points in the previous round and closed with a decrease. (the rate of decline that I used is not like the models amigurumi, I jumped a stitch -see graphic-)
.
8.- Al cerrar la última disminución, inmediatamente se empiezan a tejer puntos bajos alrededor de toda la matrioska hasta completar toda la orilla...
El tejido nos va a quedar un poco combado o abombado, para aplanar humedecemos -con un aspersor de preferencia- por atrás y pasamos la plancha caliente, dejamos secar y ya podemos seguir trabajando.
8.- At the close the last decrease, immediately begin to weave single crochet around the entire matrioska to complete all the shore ...
The weave is going to be a bit warped or curved, to flatten moisten with a spray-preference-from behind and passed the hot griddle, let it dry and we can continue working...
9.- Bordamos pelo y carita sobre el rostro...
9.- Embroider hair and face...10.- Ponemos flecos en la base y finalmente decoramos el cuerpo de la manera que prefieran, no bordé mucho para no abultar demasiado y estorbe en su función...
10.- We fringes at the bottom and then decorate the body in the way they prefer, I embroidered not too much bulk and not to interfere in its function ...

Gráfico
Graphic
Mi escáner no quiso cooperar, pero les dejo la foto del gráfico orientativo que hice...
Y Taraaaán...!, ya quedó muy mono el marcápáginas no creen?...
My scanner would not cooperate, but I leave the chart picture for guidance I made ...
And Taraaaán ...!, very cute the bookmark was not it? ...
Ojalá pronto me presuman sus trabajitos...!
Los mejores deseos para todos ustedes y au revoir!!!
Hopefully soon  presume your odd jobs!
Best wishes to all of you and au revoir!!!...