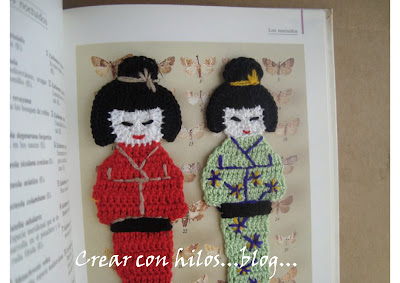
Hola por aquí!
Hi here!
Ahora con éste bonito marcapáginas en forma de Matrioska, espero les guste y se animen a hacer algunos...
Now with this beautiful bookmark as Matrioska, hope you like and encourage them to make some...
Para la función de marcapáginas (que debe ser lo más delgado posible), usé hilaza mercerizada para tejer Omega #6, en diversos colores y gancho de acero #6, además de estambre acrílico de 3 hebras para bordar...
For the function of bookmarks (which should be as thin as possible), I used to weave yarn mercerized Omega # 6 in different colors and steel hook # 6, plus acrylic yarn for embroidery...
Aquí van las instrucciones:
Here are the instructions:
Para el rostro:
1.-Aro deslizable o anillo mágico, subimos con dos cadenas y sobre él 9 puntos altos de 2 vueltas (p.a.2v.), para un total de 10 puntos, (aclaro que es una vuelta de hilo sobre el gancho, ensartamos y al sacar las lazadas o bucles sacamos el gancho 2 veces en lugar de tres que es lo normal en un punto alto o vareta, ok?).
La siguiente vuelta son todos aumentos en (p.a.2v.) y rematar hilo...
Face:1.-ring slider or magic adjustable loop, and came up with two chains and about 9 double crochet stitches (dc), for a total 10 stitches.(clarified that it is a thread around the hook, strung together and make the loops we get the hook 2 times ).
The next round is all increases in dc (for a total 20 stitches) and finish...2.-Cambiar de color y tejer en punto enano (una vuelta al sacar el gancho) un aumento en cada punto hasta terminar...
Scarf (stole):
2.-Change in color, work (1 half double crochet stitch-1 increase) at every stitch until the end ...
3.-Donde terminamos subir con 3 cadenas.
3.-Where we end up with 3 chains.
4.-De ahora en adelante tejemos en (p.a.2v.): 3 puntos, 1 aumento, 4 puntos, 1 aum. y 4 puntos, terminamos y cambiamos de color...
4.-From now on we weave in double crochet: 3 dc, 1 increase (inc), 4 dc, 1 increase and 4 dc, finish and change of color...
Para el cuerpo:
5.-Subimos con 3 cadenas, 5 p.a., 1 aum., 4p.a., 1 aum., 5 p.a.
6.-Subimos con 3 cadenas, 1 aum., 14 puntos a., 1 aum y cerramos la vuelta con 1 p.alto.
siguiente vuelta:subimos con 3 cadenas, 1 aum., 4 p.a., 1 aum., 6 p.a., 1 aum., 4 p.a, 1 aum. y cerramos con 1 punto alto.
siguiente vuelta: tejer el mismo número de puntos...
For the body:
5.-We went with 3 chains, 5 dc, 1 inc., 4 dc., 1 inc., 5 dc.
6.-We went with 3 chains, 1 inc., 14 dc, 1 inc and close the round with 1 dc.
Next round: go up with 3 chains, 1 inc., 4 dc, 1 inc., 6 dc, 1 inc., 4 dc, 1 inc. and close to 1 dc.
Next round: knit the same number of points ...

7.- Empiezan las disminuciones, son 4 vueltas que se tejen igual, ésto es: iniciamos con una disminución, tejemos el mismo número de puntos de la vuelta anterior y cerramos con una disminución. (el tipo de disminución que yo usé no es como la delos amigurumis, sino que me brinqué un punto -ver gráfico-).
7.-Declines start, are 4 turns that weave the same, that is: began to decrease, knit the same number of points in the previous round and closed with a decrease. (the rate of decline that I used is not like the models amigurumi, I jumped a stitch -see graphic-)
.
8.- Al cerrar la última disminución, inmediatamente se empiezan a tejer puntos bajos alrededor de toda la matrioska hasta completar toda la orilla...
El tejido nos va a quedar un poco combado o abombado, para aplanar humedecemos -con un aspersor de preferencia- por atrás y pasamos la plancha caliente, dejamos secar y ya podemos seguir trabajando.
8.- At the close the last decrease, immediately begin to weave single crochet around the entire matrioska to complete all the shore ...
The weave is going to be a bit warped or curved, to flatten moisten with a spray-preference-from behind and passed the hot griddle, let it dry and we can continue working...
9.- Bordamos pelo y carita sobre el rostro...
9.- Embroider hair and face...10.- Ponemos flecos en la base y finalmente decoramos el cuerpo de la manera que prefieran, no bordé mucho para no abultar demasiado y estorbe en su función...
10.- We fringes at the bottom and then decorate the body in the way they prefer, I embroidered not too much bulk and not to interfere in its function ...
Gráfico
Graphic
Mi escáner no quiso cooperar, pero les dejo la foto del gráfico orientativo que hice...
Y Taraaaán...!, ya quedó muy mono el marcápáginas no creen?...
My scanner would not cooperate, but I leave the chart picture for guidance I made ...
And Taraaaán ...!, very cute the bookmark was not it? ...
Ojalá pronto me presuman sus trabajitos...!
Los mejores deseos para todos ustedes y au revoir!!!
Hopefully soon presume your odd jobs!
Best wishes to all of you and au revoir!!!...


